

Redux is a predictable state container for JavaScript apps.
Do I need to use Redux in my React app?
It depends.
If your app is simple and works with a minimal number of states, there is no need to add redux to your app.
If your app is complex and has a lot of stuff going on, you should consider adding redux to your app. It will provide a clean and simple structure to handle states and improve the longevity of the code.
Redux vs useContext and useReducer
By utilizing React's useContext and useReducer hooks, we can provide the same functionality as Redux. The boilerplate code is significantly less, and it is much simpler.
But it's crucial that you understand how Redux functions because most software companies already use it in their projects, and it will undoubtedly help you in your next interview.
Redux Basic Concepts
There are a few simple concepts you should understand before adding redux to your react app.
Store
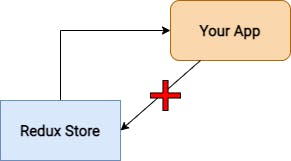
The Redux Store holds the state of your app. Your app is always subscribed to the store. But your app can't directly change the state in the store.
This is where actions and action creators come in.
Action Types, Actions and Action Creators
Action types are constants that are used to define the values used for the type property of Actions.
export const ADD_TASK = "ADD_TASK";
An action is any object with a type property. Actions help us describe what needs to happen.
{
    type: ADD_TASK
}
An action creator is simply a JS function that returns an action.
export const addTask = (task) => {
    return {
        type: ADD_TASK,
        payload: task,
    };
};
The only thing your app can do is to "dispatch" actions. Dispatch is a method provided by the react-redux library's useDispatch hook. I'll get into this later when we implement the code.
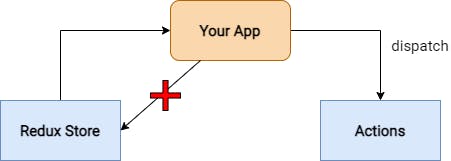
Your app can change the state in the Redux store by dispatching actions.
dispatch(addTask(task))
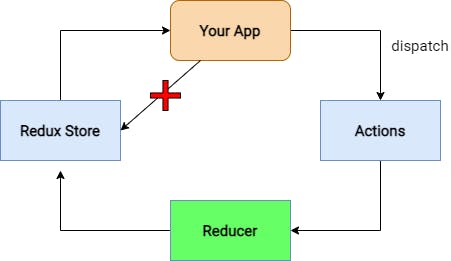
An action only describes what needs to happen. It doesn't describe how we want the states to change. We need to use a reducer for this.
Reducer
A reducer is a JS function that takes in initialState and action as input and returns an updated state object.
const initialState = {
  tasks: [],
  taskTitle: "",
  taskDescription: ""
};

const taskReducer = (state = initialState, action) => {
  switch (action.type) {
    case ADD_TASK:
      return {
        ...state,
        tasks: [...state.tasks, action.payload],
        taskTitle: "",
        taskDescription: ""
      };
    default:
      return state;
  }
};
When an action is dispatched, the relevant reducer will update the state according to the action.
When we create the Redux store, we feed all the reducers to the store. So, the reducers can update the state in the store which is what we want.
Feeling Overwhelmed?
I completely understand if you feel swamped, especially if you are only now becoming familiar with these ideas. Have no fear; I've been there. When we begin writing the code, you will have a better understanding of it.
Adding Redux to your React App
Redux will be used to manage states in my simple to-do app, which will allow users to add tasks. I'm simply doing this as a demonstration; a basic app like this doesn't need redux.
Step 1 - Installing required libraries
npm i redux react-redux @reduxjs/toolkit
Step 2 - Create Actions, Action Types and Action Creators
taskActionTypes.js
export const ADD_TASK = "ADD_TASK";
export const UPDATE_TASK_TITLE = "UPDATE_TASK_TITLE";
export const UPDATE_TASK_DESCRIPTION = "UPDATE_TASK_DESCRIPTION";
taskActions.js
import {ADD_TASK, UPDATE_TASK_DESCRIPTION, UPDATE_TASK_TITLE} from "./taskActionTypes";

export const addTask = (task) => {
    return {
        type: ADD_TASK,
        payload: task,
    };
};

export const updateTaskTitle = (value) => {
    return {
        type: UPDATE_TASK_TITLE,
        payload: value,
    };
};

export const updateTaskDescription = (value) => {
    return {
        type: UPDATE_TASK_DESCRIPTION,
        payload: value,
    };
};
When we are passing values to action creators, the convention is to call that attribute "payload".
Step 3 - Create Reducer(s)
taskReducer.js
import {ADD_TASK, UPDATE_TASK_DESCRIPTION, UPDATE_TASK_TITLE} from "./taskActionTypes";

const initialState = {
    tasks: [],
    taskTitle: "",
    taskDescription: ""
};

const taskReducer = (state = initialState, action) => {
    switch (action.type) {
        case ADD_TASK:
            return {
                ...state,
                tasks: [...state.tasks, action.payload],
                taskTitle: "",
                taskDescription: ""
            };
        case UPDATE_TASK_TITLE:
            return {
                ...state,
                taskTitle: action.payload,
            }
        case UPDATE_TASK_DESCRIPTION:
            return {
                ...state,
                taskDescription: action.payload,
            }
        default:
            return state;
    }
};

export default taskReducer;
In this case, we only need the taskReducer. But in a complex app, there will be multiple reducers to handle different states. In that case, the convention is to create a reducer called "rootReducer" by combining all the other reducers and feeding that reducer to the store.
rootReducer.js
import {combineReducers} from "redux";
import taskReducer from "./tasks/taskReducer";

const rootReducer = combineReducers({task: taskReducer});

export default rootReducer
Step 4 - Create the Store
import { configureStore } from "@reduxjs/toolkit";
import rootReducer from "./rootReducer";

const store = configureStore({ reducer: rootReducer });

export default store;
Step 5 - Wrap the Root Component with Provider
index.js
import React from "react";
import ReactDOM from "react-dom/client";
import "./index.css";
import App from "./App";
import {Provider} from "react-redux";
import store from "./redux/store";

const root = ReactDOM.createRoot(document.getElementById("root"));
root.render(
    <React.StrictMode>
        <Provider store={store}>
            <App />
        </Provider>
    </React.StrictMode>
);
Step 6 - useDispatch() and useSelector()
You can use useSelector() to access the states in the Redux store.
You can use useDispatch() to access the dispatch method which helps you to dispatch actions
import React from "react";
import {useDispatch, useSelector} from "react-redux";
import {addTask, updateTaskDescription, updateTaskTitle} from "../redux/tasks/taskActions";

const styles = {
    taskContainer: {
        display: "flex",
        flexDirection: "column",
        width: "350px"
    },
    mainContainer: {
        textAlign: '-webkit-center'
    }
}

function AddTasks() {
    const dispatch = useDispatch();
    const taskTitle = useSelector(state => state.task.taskTitle)
    const taskDescription = useSelector(state => state.task.taskDescription)

    const onAddTask = () => {
        const task = {
            title: taskTitle,
            description: taskDescription,
        }
        dispatch(addTask(task))
    };
    const onTaskTitleChange = (e) => dispatch(updateTaskTitle(e.target.value))
    const onTaskDescriptionChange = (e) => dispatch(updateTaskDescription(e.target.value))

    return (
        <div style={styles.mainContainer}>
            <div style={styles.taskContainer}>
                <input type="text" placeholder="Task Title" onChange={onTaskTitleChange} value={taskTitle} />
                <input type="text" placeholder="Task Description" onChange={onTaskDescriptionChange}
                       value={taskDescription} />
                <button onClick={onAddTask}>Add Task</button>
            </div>
        </div>
    );
}

export default AddTasks;
That's about it. We successfully added Redux to a React app.
If you want to look into the code and try in out for yourself, here is the Code Sandbox version.
Conclusion
At first glance, adding Redux to your React app could appear difficult. But it gets a lot simpler when we take each concept in turn and develop the logic on our own.
I am still trying to learn these concepts on my own. Please feel free to bring up any gaps in my reasoning and the problems you encounter.
Thank you for reading my article. If you learned something new, please make sure to drop a like and share the article among your fellow developers 🥳